#hq tutorial
Explore tagged Tumblr posts
Visit Tumblr Blog
Explore Tumblr blogs with no restrictions, modern design and the best experience.
Last Seen Tumblr Blogs


Fun Fact
Tumblr.com rank in the US is 25.
Text
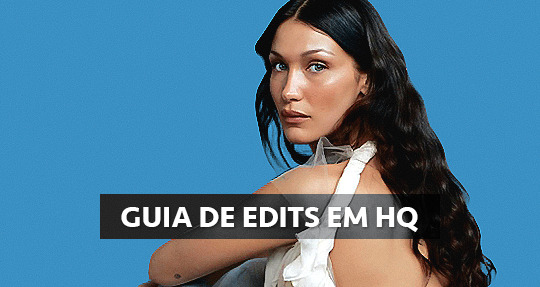
GUIA COMPLETO DE COMO EDITAR FOTOS EM ALTA QUALIDADE (HQ)!
oiê, bem vindos(as)! à pedidos, estou trazendo um tutorial bem abrangente sobre como editar fotos no geral para icons, headers, etc., em alta qualidade. neste guia/tutorial trarei dicas, truques e informações gerais sobre o que é preciso para editar em hq. lembrando que o conteúdo deste guia é sobre como eu edito, a maneira que funciona comigo e meu progresso e aprendizado ao longo de quase 12 anos editando icons, ou seja, o que contém neste guia pode — e deve — ser adaptado à sua maneira e ao software de sua preferência. aproveitem e se divirtam!
nota: este tutorial está bem longo, então, se possível, veja este guia pelo pc/notebook!
O QUE VOCÊ VAI ENCONTRAR NESTE GUIA
softwares necessários com links para download;
onde e como baixar as fotos para as edits;
métodos de edição e passo a passo;
como melhorar a qualidade de uma foto;
como salvar a foto corretamente para postar;
dicas de actions e outros resources.
clique em “continuar lendo” para ver o tutorial.
1. SOFTWARE
photoshop
eu recomendo fortemente o uso do photoshop cc na versão mais recente, ou outra versão com camera raw ou filtros neurais suportada pelo seu pc ou notebook.
você também pode usar o photopea como alternativa (eu particularmente prefiro o photoshop pois acho que as edits ficam com mais qualidade). se você preferir o photopea, algumas dicas desse guia poderão não funcionar devido à falta de algumas funcionalidades que o photopea não oferece (ex: camera raw, galeria de filtros, filtros neurais e outros).
eu uso a última versão do photoshop (atualmente, a versão 25.5.1) e uso a versão paga (obrigada adobe pelo desconto de estudante!!!!!), mas vou deixar alguns links para você baixar o photoshop gratuitamente caso você não seja estudante e/ou não tenha condições para assinar um plano.
atualmente eu uso um mac mini 2014 para editar, mas sempre usei windows, então, as dicas e os links valem para os dois sistemas operacionais.
links
macos: 1, 2 & 3.
windows: 1, 2, 3 & 4.
2. BAIXANDO AS FOTOS
galerias de fotos
muitos artistas têm fansites com galerias de fotos e você pode achar facilmente digitando no google: “nome da pessoa + gallery”.
o artista que eu quero não tem galeria própria e agora? tranquilo, ainda temos galerias de fotos de famosos variados como hqdiesel, hqsource, hq-pictures e até mesmo o theplace.
em último caso você pode usar o gettyimages e usar um removedor de marca d’água ou um site como o gettyimages downloader.
instagram
para artistas estrangeiros que tenham apenas instagram e/ou não tenham fotos em galerias de imagens, eu recomendo o instagram pessoal da pessoa.
você poderá fazer o download das fotos com extensões de navegadores como o image downloader for instagram (para firefox e google chrome), ou sites como o saveig, o snapinsta ou o igdownloader.
eu recomendo baixar pela extensão do navegador, pois ela baixa a foto direto do site do instagram no computador, diferente dos sites que você precisará ir foto por foto, copiar o link e colar no site para fazer o download.
mas, caso a extensão esteja indisponível, com algum erro ou pare de funcionar, o site é uma excelente alternativa (só precisa ter mais paciência).
nos sites para baixar fotos do instagram, geralmente eles dão a opção para você escolher o tamanho da foto. você deve sempre selecionar a resolução maior da foto (acima de 1000px é o melhor).
pinterest
em casos extremos de artistas low profile, sem instagram, sem aparições públicas, sem galerias de fotos, nadica de nada, eu recorro ao pinterest.
porém, é preciso ter muito cuidado ao fazer download de fotos do pinterest, porque são muitas fotos repetidas e muitas com baixíssima resolução e qualidade.
se você for baixar fotos do pinterest, escolha a foto com maior resolução (imagens maiores que 500px já são ok para editar icons), e depois de baixar a foto, eu recomendo fazer um tratamento na foto para melhorar a qualidade dela, como vou ensinar.
3. EDITANDO
3.1 importando a foto no photoshop
apertando ctrl+o ou cmd+o uma guia vai abrir no programa, onde você vai até a pasta onde a foto foi salva. selecione a foto e clique duas vezes nela para abrir.
3.2 cortando a foto nas dimensões desejadas
muitos tutoriais de edições de icons sugerem que você copie a imagem e cole ela em um documento novo já do tamanho da sua edit, mas eu não recomendo essa opção, pois ao redimensionar a foto com a ferramenta de transformar (ctrl+t), ela dá poucas opções para manter a qualidade da foto e se você não souber o que cada opção faz, poderá perder a qualidade da imagem. então, eu sempre faço o recorte na própria foto para não alterar muito a qualidade dela.
aperte a letra c no teclado para abrir o atalho da ferramenta de corte. (se o seu photoshop for alguma versão do cc, eu recomendo que você marque a opção para usar o modo clássico de corte, assim fica mais fácil e você tem um controle maior sobre a ferramenta!). para fazer essa alteração é simples, vá no ícone de engrenagem, clique e marque a opção “usar modo clássico”.
para fazer icons, você deverá cortá-lo usado dimensões quadradas, ou seja, 1x1, e para headers 15x5. você pode mudar as dimensões na caixinha da ferramenta de corte.
3.3 redimensionando a foto
nessa parte você precisará prestar atenção, pois ao redimensionar a foto, você poderá perder ou ganhar um pouco mais de qualidade na foto, e para isso você usará uma opção chamada reamostrar (ou resample se seu photoshop estiver em inglês). deixe a opção marcada para usar as definições.

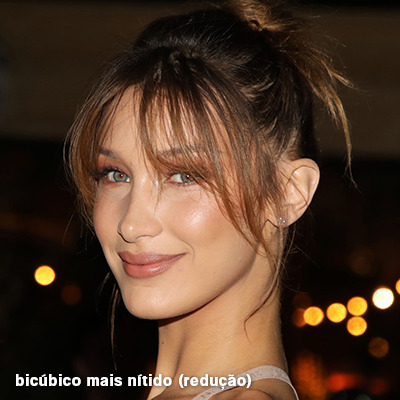
3.4 explicando as definições do reamostrar e qual definição usar de acordo com o resultado que você quer
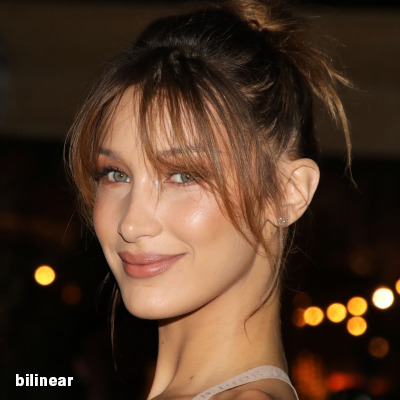


bilinear: a melhor opção para redimensionar gifs, mas para fotos não é tão bom pois dependendo da foto algumas partes ficam nítidas, outras mais suaves e se você for aplicar action de nitidez, pode ficar com um aspecto de “craquelado” com as bordas granuladas, o que eu pessoalmente acho que fica um pouco estranho.
bicúbico mais suave (ampliação): como o nome já diz, ele deixa a foto mais suave, ou seja, os pixels “craquelados” e granulados da foto ficarão mais suaves. é uma ótima opção tanto se você for aplicar actions de nitidez ou actions mais desfocadas e mais suaves.
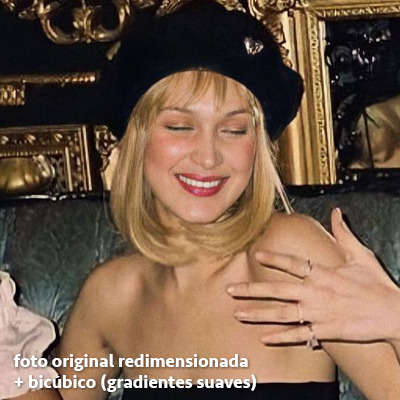
bicúbico (gradientes suaves): pode parecer a mesma coisa do bicúbico mais suave, mas esta opção além de suavizar a imagem, cria um “desfoque iluminado” nas transições das cores da foto. é a melhor opção para fotos sem muita qualidade e principalmente se você for usar actions suaves e desfocadas, sem muita nitidez.
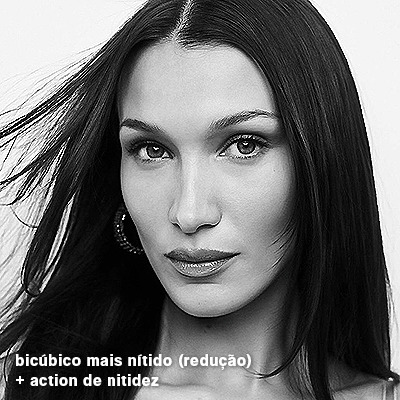
bicúbico mais nítido (redução): acentua os pixels e as arestas nítidas da foto, ou seja, essa definição redimensiona a imagem mas preserva a nitidez da foto. se você usa actions de nitidez que não tem desfoque nas configurações, essa é a melhor opção de reamostra. (mas cuidado, se sua imagem ficar muito nítida com essa definição, você precisará usar outra opção. caso contrário, quando você aplicar a action, a edit poderá ficar muito exagerada e/ou com aspecto áspero.)
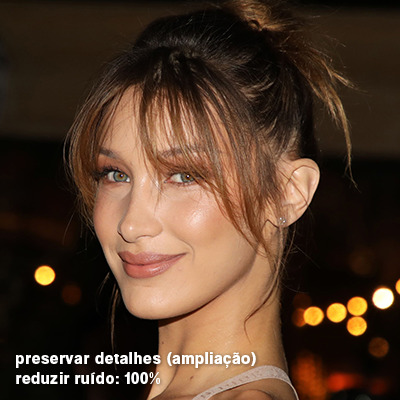
preservar detalhes (ampliação) com redução de ruído: esse em especial é ótimo para quando você precisar redimensionar uma foto para deixá-la maior sem distorcer tanto a imagem. você pode ajustar a redução de ruído para deixar a foto mais suave, sem perder muita qualidade. (obs.: essa opção não deve ser usada para redimensionar imagens muito pequenas, por exemplo de 200x200 para 400x400, ou a imagem vai ficar muito distorcida. ela deve ser usada quando a diferença de pixels não é muito grande, por exemplo, você cortou a foto e ela ficou no tamanho 370x370, aí sim você pode redimensionar para maior sem perder muito da qualidade. então você pode ir ajustando a qualidade com a porcentagem da redução de ruído).
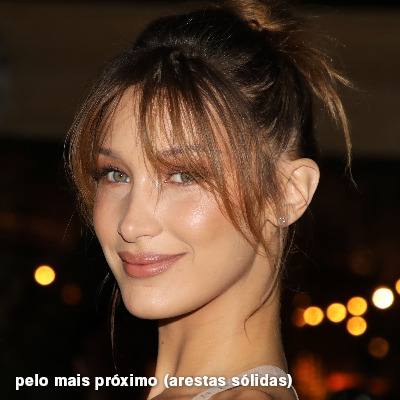
pelo mais próximo (arestas sólidas): essa é uma opção traiçoeira, pois não fica bem em quase nenhuma imagem (a menos que seja um pixel art). essa definição redimensiona a imagem e mantém os pixels nítidos, ou seja, a foto fica menor mas tudo nela que tem aspereza vai prevalecer. é muito usada para redimensionar pixel art, pois preserva as bordas ásperas. pode ocorrer de ficar boa em uma foto aleatória mas não será possível aplicar action, ou a imagem ficará exagerada.
3.5 aplicando a nitidez depois de redimensionar
depois de escolher a foto, baixar, redimensionar de acordo com o estilo da action da sua escolha, está na hora de aplicar.
eu fiz duas versões para mostrar como fica com cada tipo de action:

assim, os dois icons tem uma alta qualidade usando actions diferentes, graças a remostragem ideal para cada tipo de action :)
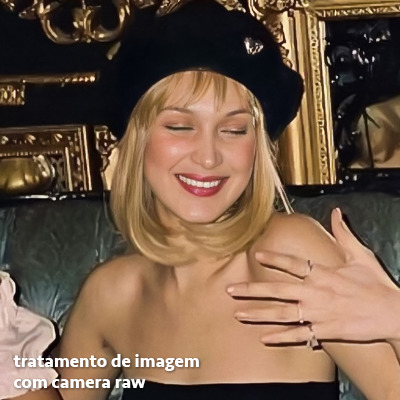
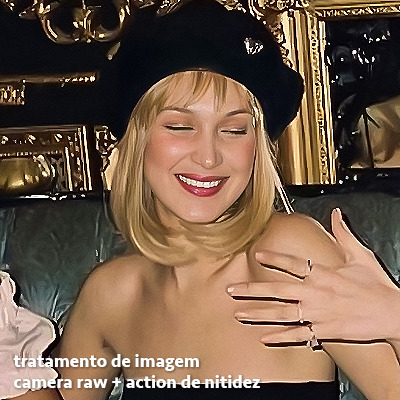
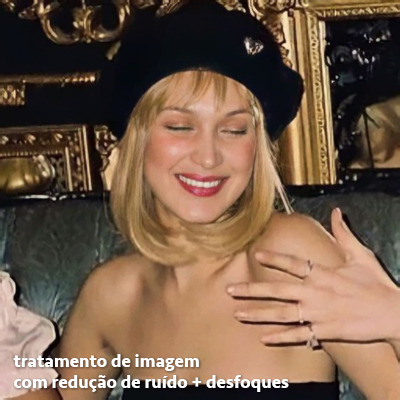
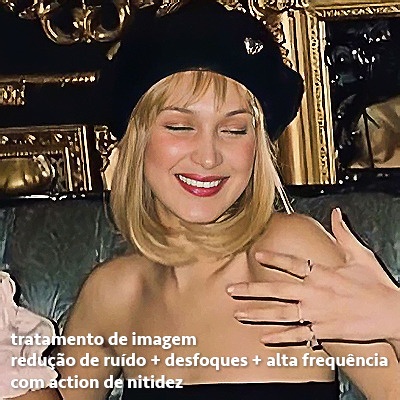
4. TRATAMENTO DE IMAGEM PARA MELHORAR A QUALIDADE
nesta parte, é muito importante que você tenha baixado uma versão do photoshop com neural filters e/ou com o camera raw, mas caso você não tenha, tudo bem também, vou ensinar como fazer uma melhoria na foto de três jeitos: com camera raw, com neural filters e com desfoques. a melhor forma vai depender de quão ruim está a qualidade da sua foto. em geral, apenas fazendo ajustes no camera raw você já tem um ótimo resultado na maioria das fotos.
camera raw
se seu photoshop tem o filtro do camera raw, ele vai estar em filtro > filtro do camera raw...
tudo que iremos fazer será na aba de “detalhe”, ali você deve dar mais atenção ao ajuste de redução de ruído, pois é ele que vai remover o ruído da imagem e melhorar a qualidade dela.
vá mexendo nas configurações de redução de ruído até que a foto fique mais suave. ajuste também o detalhe e o contraste da redução de ruído.
essa parte será mais no olhômetro mesmo, pois as configurações vão variar de foto para foto, mas eu recomendo muito você mexer também na nitidez para não deixar a foto tão desfocada, mas nada muito intenso para não interferir na action que você irá usar.
eu mexo também na redução de ruído de cores, porque dependendo da foto, algumas cores estarão saturadas ou com muito ruído. só cuidado para não colocar um número muito alto, pois esse ajuste pode tirar a saturação da sua foto e deixá-la apagada.
enfim, aqui está uma comparação da foto original com o tratamento feito com o filtro do camera raw e depois já com a action de nitidez aplicada:
e essas foram as configurações que usei nessa foto em específico:
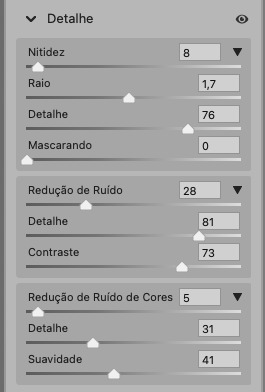
como eu disse antes, as configurações irão variar de foto para foto, a depender da qualidade de cada uma e de quão ruim a foto está, mas com essa configuração básica, você já vai conseguir melhorar algumas fotos.
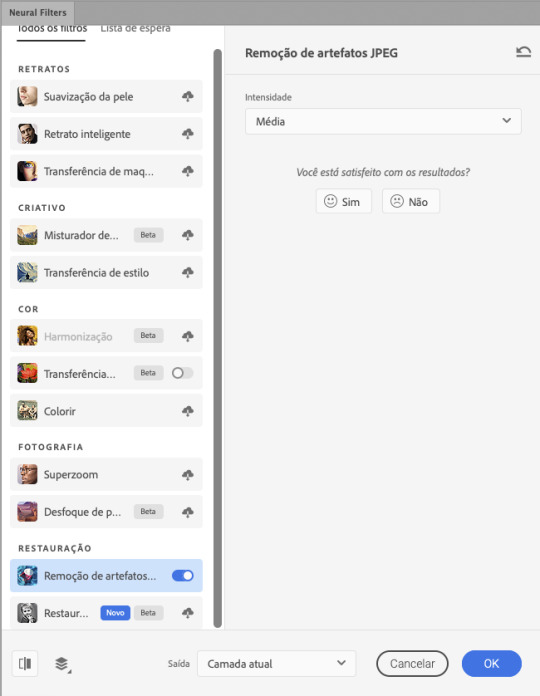
neural filters
se a versão do seu photoshop vem com neural filters (ou filtros neurais), ele estará em filtro > neural filters...
irá abrir uma janela com vários filtros mas o que a gente irá usar vai estar em “restauração”, com o nome “remover artefatos jpeg”. se precisar, faça o download do filtro.
eu recomendo usar a intensidade sempre média, a menos que a foto esteja muito ruim, aí você usa a intensidade alta. mas em geral, a intensidade média ou baixa já dá conta do recado.
a saída deve sempre estar na camada atual, ou seja, na camada da foto selecionada.
assim:
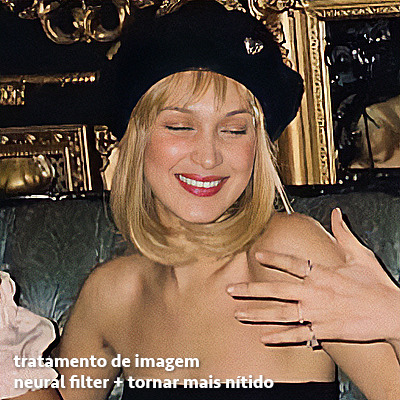
e aqui está uma comparação da foto original com o tratamento feito com o neural filter e depois já com a action suave com desfoque aplicada:

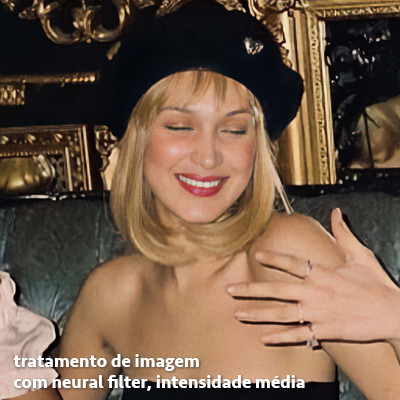

a opção do neural filter é uma ótima alternativa ao camera raw, o único contra é que ele deixa a foto com uma textura áspera, e quando você usa uma action de nitidez eles ficam muito visíveis e acaba não ficando muito legal.
porém, um bom jeito de contornar isso é adicionando ruído na foto. eu uso o efeito de granulação do camera raw para adicionar ruído no icon (você também pode adicionar o ruído em filtro > ruído > adicionar ruído..., mas eu prefiro o camera raw pois ele dá mais opções para ajustar o granulado do jeito que eu preferir).
no primeiro icon abaixo, dá para perceber a textura áspera que o neural filter deixa depois de melhorar a foto e adicionar nitidez; já no segundo icon eu mostro como eu adicionei o ruído e contornei esse defeito.

as configurações de ruído que usei no camera raw foi 12 de granulado, 35 de tamanho e 20 de aspereza.
lembrando que, se você for usar uma action de desfoque e/ou remoção de ruído, não será necessário adicionar a granulação, pois a própria action já vai suavizar a textura do neural filter (a menos que você queira adicionar o ruído, claro).
redução de ruído + desfoque
caso a sua versão do photoshop não tenha nenhuma das opções de camera raw ou neural filter, caso você use um photoshop mais antigo, photoshop portable ou prefira usar o photopea, essas alternativas podem ser úteis.
mais uma vez, irei me basear no olhômetro, de acordo com a foto e irei ajustando as configurações de acordo com o que eu quero e acho necessário.
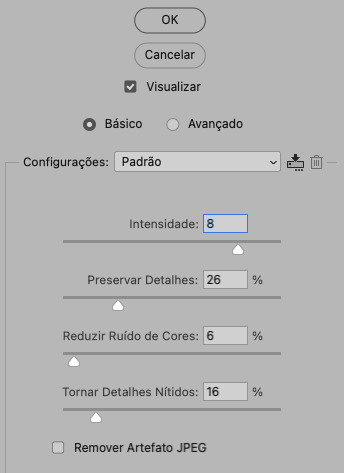
vamos começar com a redução de ruído! ele está em filtro > ruído > reduzir ruído...
na janela de redução de ruídos você verá alguns ajustes que são: intensidade, preservar detalhes, reduzir ruído de cores e tornar detalhes nítidos e vou explicar cada um para que você possa saber ajustar eles de acordo com sua foto:
intensidade: o número de 1 a 10 irá definir a intensidade da luminescência, a intensidade do filtro e o quanto da imagem você quer preservar ou extinguir, sendo 1 o mínimo da intensidade do filtro e 10 o máximo;
preservar detalhes: o número digitado irá definir a porcentagem de detalhes a serem preservados. quanto maior o número, maiores serão os detalhes mantidos na foto, como ruídos, manchas e outras aberrações da foto;
reduzir ruído de cores: o número digitado irá definir a intensidade e reduzir o ruído cromático, ou seja, vai reduzir as aberrações cromáticas, como por exemplo, fotos que distorcem as cores. preste atenção na porcentagem inserida, pois quanto maior o número, menos saturação sua foto terá e poderá ficar com aspecto de foto envelhecida;
tornar detalhes nítidos: o número digitado vai definir a porcentagem de nitidez para restaurar pequenos detalhes da foto. quanto maior a porcentagem, maior vai ser a intensidade dos detalhes da foto. preste atenção na porcentagem inserida, pois se a intensidade da nitidez for muito alto, vai afetar a sua action, seja ela de nitidez ou de desfoque.
sendo assim, para a foto usada eu fiz estes ajustes:
obs.: se você for um usuário mais avançado do photoshop, poderá explorar a opção avançado, que possui as configurações básicas para melhorar a foto e também as configurações para remover ruído das cores primárias (vermelho, amarelo e azul) individualmente. mas, mesmo se você não for um usuário expert, eu recomendo você dar uma olhada nessa opção e explorá-la, mexendo nas configurações e ir ajustando e aprendendo, pois o resultado poderá ficar ainda melhor nos ajustes avançados.
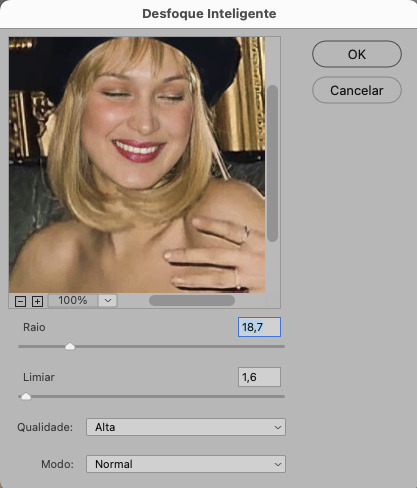
aplicado a redução de ruído, vamos partir para o desfoque! eu estarei usando o desfoque inteligente antes do desfoque de caixa. você vai achá-lo em filtro > desfoque > desfoque inteligente...
na janela que abrirá, você verá os ajustes: raio, limiar, qualidade e modo. vou explicar eles:
raio: vai determinar o tamanho da área que será considerada para o desfoque. quanto maior o número, mais detalhe serão preservados;
limiar: vai determinar a diferença dos pixels entre si antes de serem alterados pelo desfoque.quanto maior o número, maior será a área em que o desfoque será aplicado;
qualidade: vai determinar a qualidade e intensidade do desfoque. ao escolher a opção mais alta, mais partes da foto o desfoque atingirá;
modo: vai determinar o traçado das linhas de bordas que o filtro identificar. o modo normal aqui é o ideal, pois os outros modos “somente arestas” e “sobrepor arestas” irão identificar somente as bordas da imagem.
sendo assim, esses foram os ajustes:
após o desfoque inteligente, partiremos para o desfoque de caixa! ele está em filtro > desfoque > desfoque de caixa...
(você também poderá usar o desfoque gaussiano a depender da foto, mas para esta em questão, o desfoque de caixa funcionou perfeitamente)
a intensidade do desfoque de caixa, assim como do desfoque gaussiano, é medida em pixels e o mínimo é 1 pixel, e para icons é uma intensidade forte, então eu coloco o número mínimo (1, no caso) e depois de clicar em OK e aplicar o desfoque, vou em editar > atenuar desfoque de caixa... e ajusto a porcentagem de acordo com a foto. nessa foto deixei a porcentagem em 33% e ficou ótimo.
no entanto, infelizmente, por não ser o melhor método para melhorar a qualidade de uma imagem, ela ficará um pouco desfocada demais. mas podemos contornar isso usando o filtro alta frequência para devolver um pouco da nitidez e detalhes na foto. você encontrará esse filtro em filtro > outros > alta frequência...
o filtro de alta frequência, assim como os desfoques, é medido através de pixels e quanto maior o número, mais detalhes passarão despercebidos, ou seja, menos detalhes e menos nitidez sua foto terá. eu recomendo em torno de 2px se você quiser mais detalhes e em torno de 5px se você quer mais suavidade.
a primeira vista esse filtro parecerá estranho e distorcido, mas dará tudo certo, você só precisará mudar o modo de mesclagem. para isso vá em editar > atenuar alta frequência e mudar o modo de mesclagem para “sobrepor” ou “luz indireta” se você quiser que fique mais suave. se preferir, poderá também ajustar a opacidade para os detalhes ficarem mais ou menos intensos.
assim:
assim fica o resultado sem o filtro de alta frequência e com o filtro:

sendo assim, fica a seu critério usar o filtro ou não.
aqui está a comparação das fotos com o tratamento de redução de ruído + desfoque com e sem o uso das duas actions:
5. SALVANDO A EDIÇÃO
e chegou a melhor parte: salvar a edição para postar!
seja a edição um icon, uma header, ou qualquer outro gráfico estático (edições não animadas), a melhor opção é sempre, sempre, SEMPRE, salvar no formato PNG!
o formato jpg ou jpeg não preserva a qualidade original como o formato png preserva. então, sempre escolha esse formato ao salvar suas edições estáticas!
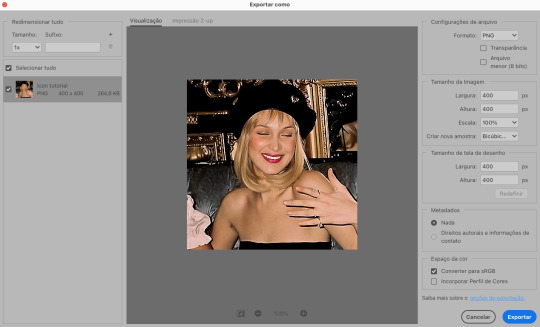
a melhor forma de salvar uma edição em alta qualidade é exportando ela. sendo assim, vá em arquivo > exportar > exportar como...
em “configuração de arquivo”, selecione o formato PNG e desmarque a opção “transparência” se sua foto não é uma imagem com fundo transparente; em “tamanho da imagem” deixe como a altura, a largura e a escola como estão, apenas mude a opção em “criar nova amostra” para BICÚBICO AUTOMÁTICO; e em “espaço da cor” marque a opção CONVERTER PARA SRGB, porque assim, independente da calibração do seu monitor, a foto ficará com as cores originais e não sofrerá alteração.
assim:
no entanto, se você tiver um pc ou notebook lento, ou apenas não tiver paciência para salvar sua edit em exportar, você pode salvar no modo normal, indo em arquivo > salvar como... OU arquivo > salvar uma cópia..., no entanto, se você for usar essa opção, não esqueça de marcar a caixinha para “incorporar o perfil de cores srbg”, essa opção geralmente fica na parte de baixo da janela que abre quando você vai salvar a edição.
6. ACTIONS & RESOURCES
para facilitar pra vocês, todos as configurações de filtros usados neste guia, estarão disponíveis para download em uma pasta de action. para fazer o download é só clicar aqui: ★. já a dupla de actions usadas (a de nitidez & a de desfoque suave) estarão disponíveis para download na lista de dicas abaixo.
dicas de actions de nitidez – premium & gratuitas (free)
lovie potion by @loviestudio [premium]
action #26 by @harupsds [premium]
action #25 by @harupsds [free]
01 action by @harupsds [free]
cherrie by @loviestudio [free]
action #11 by @miniepsds [premium]
face action by @miniepsds [premium]
crispy by @nebulies [free]
scarlett by @l-agallerrie [free]
eight action by @peachcoloring [premium]
bubblegum by @hisources [free]
kendall by @hisources [premium]
hekate by @hisources [premium]
sharpen by @l-agallerrie [free]
#01 action by @buntterflies [free]
dicas de actions “suaves” – premium & gratuitas (free)
teddy bear by @loviestudio [free]
action ten by @peachcoloring [premium]
caelestis by @miniepsds [premium]
fleuriste by @hisources [free]
angel by @loviestudio [free]
action #13 by @harupsds [premium]
action #12 by @harupsds [premium]
wild action by @hisources [free]
outras actions – premium & gratuitas (free)
denoise action effect — remove o ruído das fotos sem perder muita qualidade by @loviestudio [premium]
photopea quality action — action para melhorar a qualidade da foto no photopea by @loviestudio [free]
exclusive hq actions — um conjunto com as actions que foram usadas neste tutorial by @girasois, @loviestudio [free]
denoise and sharpen actions — conjunto de actions para melhorar a qualidade da foto automativamente by heavnsent
7. BÔNUS: DICAS EXTRAS
a adobe cc learn tem muitos tutoriais que você pode dar uma olhada e aprender muito mais sobre o photoshop e outros programas da adobe!
o youtube é outra fonte incrível para você aprender edição no photoshop, lá você encontra tutorial para quase tudo de edição de fotos e muito mais! se você entende inglês, eu recomendo muito os canais piximperfect e brendan williams tutorials.
para fonte de inspirações, o tumblr é o lugar certo! se jogue nas tags para se inspirar e nos blogs de photoshop para ver muito mais tutoriais e muito mais resources.
o blog @looksgreat infelizmente não é mais atualizado, mas você ainda pode encontrar muitos tutoriais sobre quase tudo de edição, e o melhor, todos os tutoriais são em português!!
ainda recomendo outros tumblr brasileiros de resources e tutoriais: @miniepsds, @harupsds, @peachcoloring, @gmfioart, @colour-source, @l-agallerrie, @wasirauhlpsds, @hisources, @opulenceps, @sunshinepsds, e @loviestudio; e no deviantart: jungrainsoul, rockjealous, heavnsent, aureangels e rohdossantos.
8. CRÉDITOS E INFORMAÇÕES
crédito colorings
off hearts + whimsy by @miniepsds ♡
informações
antes de tudo eu gostaria de pedir desculpas pelo tamanho deste guia, mas eu quis abranger o máximo de dicas possíveis para vocês e deixar o tutorial super completinho.
em segundo lugar eu gostaria de agradecer todo o carinho de vocês, isso me motiva muito a continuar. obrigada, de coração!
enfim, é isso! minha ask estará sempre aberta para dúvidas, sugestões, pedidos e mensagens fofas (sempre com educação e respeito, claro)!
#tutorial#photoshop tutorial#tutoriais#tutorials#resources#hq tutorial#tips#useful#ptbr#adobe photoshop#photopea tutorial#tutorial tips#dicas#dicas de edição#dicas de actions#guia completo#guia#guia de edição#guia de edits#edits tutorial#edit tag#masterpost#long post#editing tips#icon tutorial#header tutorial#hq edits
168 notes
·
View notes
Text
HQ Screenshot Mini Guide (maybe?)
i THINK i may have figured out how to take HQ screenshots without using SRWE!!
After seeing this post by @moonlitfalls , i started watching some tutorials on SRWE and it just seemed to complicated to use every time i wanted to take a screenshot lol, so i dug a little more and found this post by @glittermutt ! Which led me to dig even deeper and find an even easier way to do it! (yes, i'm so lazy i really needed to find a way to do it with the least amount of effort...also this only works if you have a NVIDIA Gpu i believe, cause you need geforce experience.)
So far it seems to be working pretty well for me, so maybe it'll work for you too! Worth a shot.
Step by step under the cut...
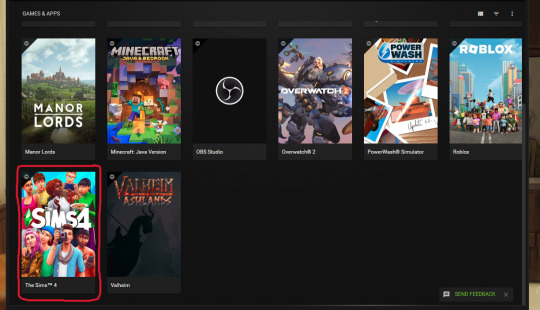
ANYWAYS. all you have to do is open up GeForce Experience and find your game:
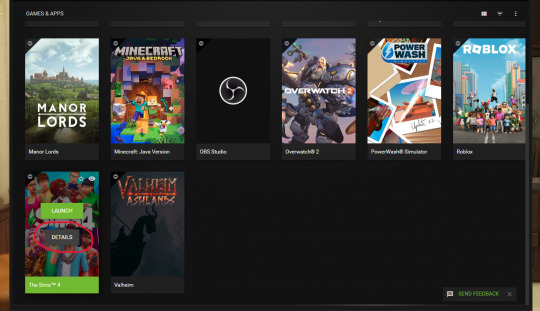
THEN, hover over it and click "details":
It'll bring you to this screen and you click on the wrench icon:

And then a little window pops up and you choose one of the dynamic super resolution sizes (i went with the bigger one cause my GPU can handle it):
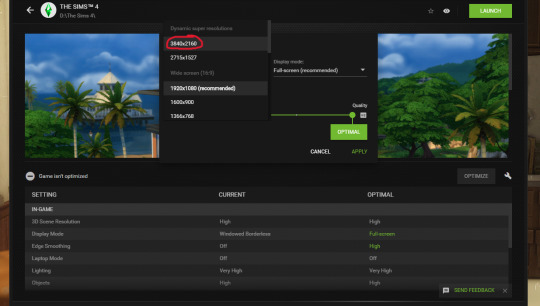
And then just click apply! ( you can also choose fullscreen or windowed etc, whatever you like to play your game with)
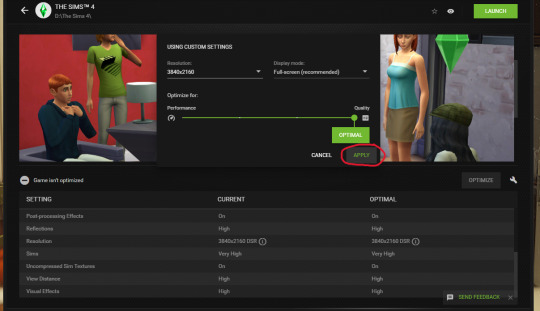
And voila! That's it, pretty much.
Now when you open your game, it should automatically be set to run at that larger resolution. You can check in your in-game graphic settings. Then you just take your screenshots, and you can change the resolution in game back to whatever you originally had it at if you want to, so it doesnt put too much strain on your GPU while you play.
Hope that all made sense?? Let me know if it works for you!
82 notes
·
View notes
Text
😭Before HQ Mod ✨After HQ Mod
(High Graphics) (Very High Graphics)
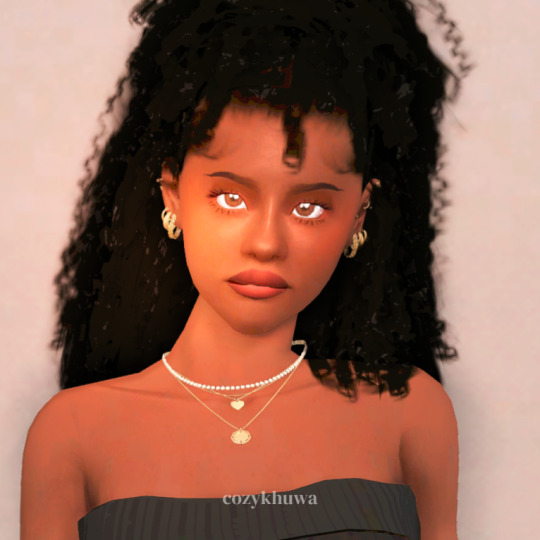
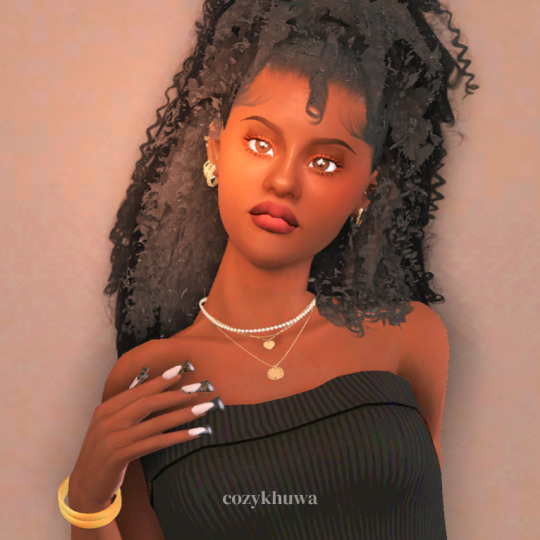
Both of these picture are taken INGAME with gshade, relight, lighting mod etc.
Not the before even looking less confident (it was unintentional) 😂
Notice how the hair is blurry, as well as the makeup. The nails were also invisible...
I always wondered why my sims in game don't look as crisp and amazing as they do in CAS, also the makeup either didn't show up or looked totally different... Turns out the graphics in CAS are set to 2k and the high graphics in game are 1k😩 I fixed that with the help of Frankie's ( @sims3tutorialhub ) tutorial on how to make your own HQ Mod, I'm now 100% in love chile!
#ts3#the sims 3#sims 3#sims 3 simblr#thesims3#sims 3 screenshots#ts3 screenshots#Sims 3 hq mod#sims 3 tutorial#Sims 3 gshade#cozykhuwa sims 3 screenshots#cozykhuwa
28 notes
·
View notes
Text
im going insane cause i accidentally found an obscure musical because i was googling a book i found in the bookstore and found the word play/stage in Japanese pop up
if anyone have any literally any recording of the musical 『ルームメイトと謎解きを』(Solving the riddle with roommates) please please please tell me
and if anyone has any recording of 『劇団ハイキュー!!』please please please also tell me. i found the recording to『演劇ハイキュー!!』but none for 劇団 and they don't have a proshot on amazon jp
#please help a girl out#another production in the “i would love to watch but i can't find the dvd nor do i have money” list#disney-forever-and-evermore#ハイパープロジェクション演劇ハイキュー!!#hyper projection engeki haikyuu!!#ハイステ#haisute#ハイキュー!!#haikyuu!!#haikyuu stage play#hq stage#engeki haikyuu#ルームメイトと謎解きを#solving the riddle with roommates#bootleg#musical bootleg#slime tutorials#japanese musicals
2 notes
·
View notes
Text
How to install / Use default Underwear in to the sims 4 with the HQ mod
For what reason my underwear doesn't work??
If you use the HQ mod, you know that to have it work correctly you need to install replacement HQ files, the problem with them is that when you install a cas override mod your game looks as if you had never put the mods on your mods file, this happens because you have two overrides at the same time and for overrides you can only have 1, so in this tutorial I will show you how to remove the Hq override that does not allow you to use the default mod of your underwear.
First
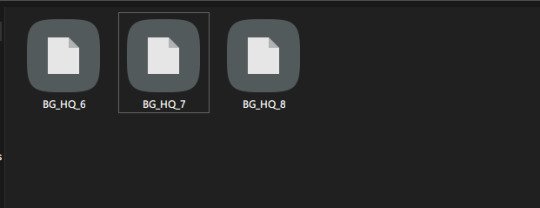
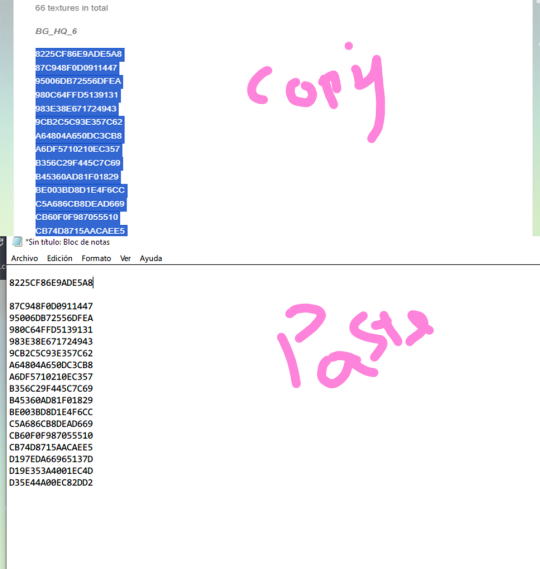
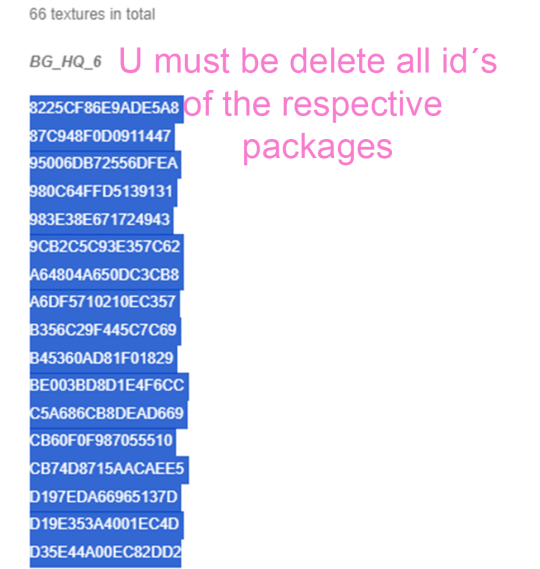
U must have to have the latest versions of the Hq file replacement of the base game. If you want to install the default HQ skin, check out my tutorial. The creator of these repalaces only has skin IDs, not default underwear IDs. To be more specific, the IDs are a list of numbers and letters that contain the names of the textures that we will need to delete from the packages: BG_HQ_6, BG_HQ_7, BG_HQ_8 (How to get these IDs in the second step)
Second
U must be donwload a text file that I created with the name of the Hq package replaces and their respective IDs. Donwload
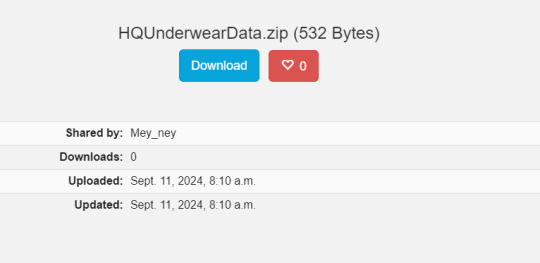
And you will uncompress the zip; on that, you will have 3 files with the name of the 3 Hq base game replaces.
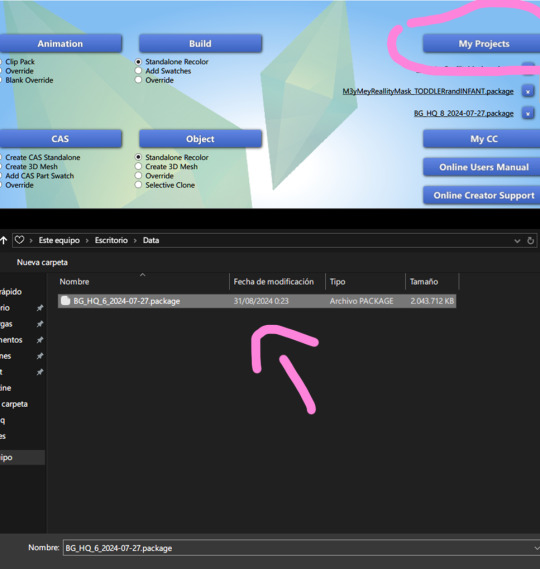
Third
Now i´ll explain u how use those files on the packages replaces. i´ll make the tutorial whit BG_HQ_6 but THE PROCESS IS THE SAME WHIT ALL PACKAGE I´LL ONLY SHOW U WHIT THIS BECAUSE IS LITERALLY THE SAME WHIT THE LEFT OVER!!
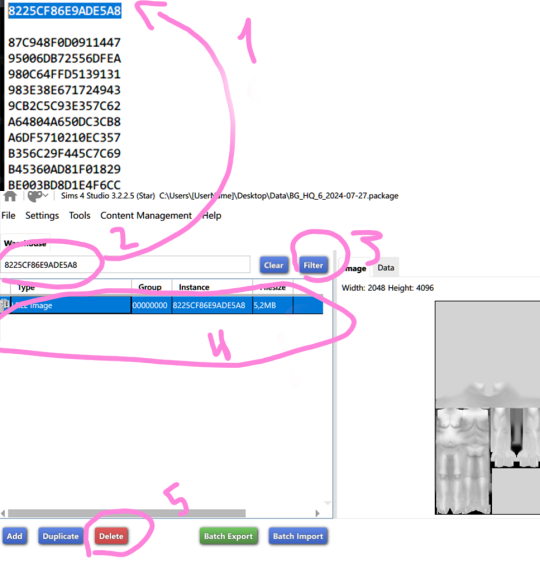
so.... we i´ll open whit the S4studio the package BG_HQ_6

With the opened package, we will copy the ID that is in the text file that has the same name as the package, and we will paste these on the S4 searcher.
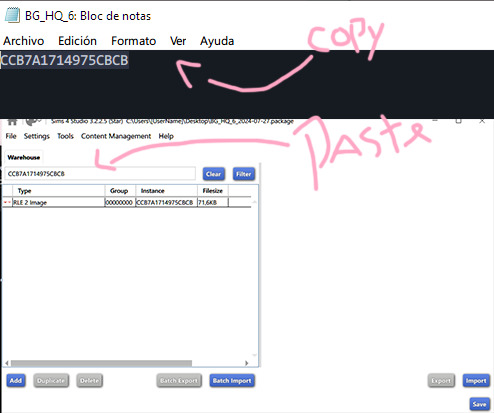
After you paste the ID, you need to click on filter, select the image, and click on delete:

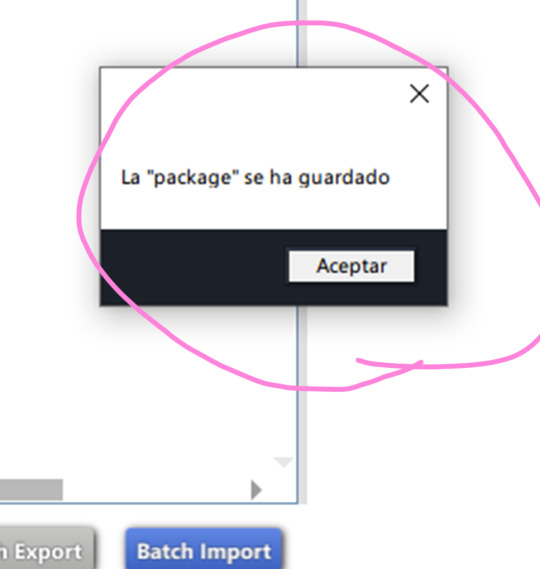
Remember save the changes!!!!
IMPORTANT

⚠To be careful at hour of deleting texture, you must be pretty sure that you are downloading an override for this texture. For example, if you delete all texture but only downloaded a CC default underwear for women, the left-over ages will have a black texture on their underwear, so when you delete the textures on the s4studio, check the age of the image (I suppose that you recognize the ages of the underwear textures)⚠
⚠I have only taken out a single swatch, more specifically the texture that appears when you remove the clothes from the sim for all ages. If the CC that you downloaded contains more than one swatch, it will not be seen in the game; the original texture that corresponds to it will appear. Taking out these IDs is very complicated; if you want more samples, you will have to do it manually⚠
Literally, that's all. It's not that complicated, just slow. If for some reason the S4 Studio is slow when you hit save, it's normal. Just let it load. Even if it doesn't respond, eventually it will. Keep in mind that you are deleting textures from a file. about 3 or 2 gb.
And that's all!! I hope that if you are having a problem with this, that tut can be useful, and if you want, you can see my default underwear for all ages that is compatible here ୨ৎ
#sims 4#the sims 4#ts4cc#ts4 alpha#ts4 simblr#ts4#simblr#sims 4 gameplay#sims 4 tutorial#sims4 hq mod#sims4 cas
5 notes
·
View notes
Text

Fucks sake people block and report these fucking users idc if you potentially shoot dead new users when a blog w/o icon follows you, that is tumblrs problem! Not yours!
But i'm fucking tired of getting these every other day just bc someone probably didn't block and report them!
The fact that new users are guided to follow new blogs before setting a pfp is really not your problem! @staff needs to fix that on their own. But i'm not in the mood to get these spam messages day after day just bc someone was scared of blocking and reporting a new user!
#fckn hell#if you're a new user and you don't set a new pfp within the day you make your account you just lost imo#staff needs to incorporate setting a pfp into their tutorial for new users#that would honestly be the best option#but they're cowards#if i get deleted for that i'm coming for hq next
2 notes
·
View notes
Photo
this is a game changer! how did i not know about editing the graphicsrules.sgr ?! everything looks soooo good

PSA - How to get HQ textures for CC objects.
In a recent patch, EA capped texture sizes making CC with HQ textures look blurry, but you can fix it to get your crispy textures back!
You can either download my HQ Mod (updated recently to include this fix), or fix it yourself by editing the graphicsrules.sgr - instructions are under the cut.
Keep reading
#ts4#sims 4#sims 4 psa#sims 4 hq#sims 4 objects#tutorials#sims#sims 4 mods#simblr#the sims community#sims screenshots#sims 4 screenshots
1K notes
·
View notes
Text

random horny thoughts about hq men - seijoh + nekoma edition

CHARACTERS: mattsun, iwaizumi, makki, oikawa, kuroo, kenma, shohei CWS: nsfw, smut, all characters 18+, knife play, implied d/s undertones to a lot of these, toxic relationship elements, cheating/cucking if you squint, corruption kink, oral (f!receiving), bondage, spit kink NOTES: continue to enjoy my gross thoughts as i pull myself out of whatever writer's block hell i'm in. thank you to the anon who suggested shohei's - i accidentally deleted it i'm so sorry 😀
mattsun loves knife play. the idea of cutting your tights away from your body, tracing the knife ever so gently up the inside of your thigh before rippppp the metal tears through like butter. the flash of fear and unbridled lust in your eyes bricks him up instantly. he slots his thigh between yours and presses the flat of the blade ever so gently against your thrumming pulse. "ready to play, angel?"
iwaizumi finds out your ex never made you cum and makes it his personal mission to give you as many orgasms as possible. his fingers, tongue, dick, thighs, he wants to get you off in every way possible and erase that idiot’s ineptitude from your brain. “you cum so easily, baby. the fuck was your ex talking about?”
makki loves when you talk back. it’s foreplay for him to take you out somewhere nice and relentlessly tease you all night, each of you trading good-natured barbs that run just a little bit nasty (he likes when you’re mean, what can he say). there’s always a line, though, and when you cross it, his hand grips the back of your neck hard enough to stop you short. "I think we should go home, don't you?"
oikawa is prone to toxic situationships that always result in hurt feelings (his own). he sees you out with other guys and it actually boils his blood to the point where he’s calling you, whining about how you don’t make time for him anymore, and when you come over, he fucks you face down on the mattress to remind you that he’s the only one who knows how to make you cum the way you like
he’s super embarassed about it, but kuroo has a little bit of a corruption kink. like the first time he goes down on you and you get all blushy and embarassed - he’s hard as a rock. soothes you with soft kisses on your neck and stomach as he tells you how beautiful you look, how good you are just for him. he’s gentle in how he eats but he’s determined to make you as crazy for him as he is for you
kenma is lazy this kenma is lazy that - kenma finds out how much you like to be tied up and learns everything he can about bondage play. he buys a dummy to practice on (kuroo absolutely loses his mind over this), he watches tutorials, boy is dedicated to finding out how to make you cum this way. when this skinny streamer guy asks you out, you have no idea you’re gonna be roped into a bondage belt with a happy strap grazing over your clit as you sob into his arms (but you're not complaining)
your first impression of shohei is that he’s never known the touch of a woman but HOO BOY were you wrong. this man is a FREAK between the sheets. you can’t believe that the mild-mannered dude who barely says a word forces your mouth open so he can spit directly onto your tongue. by the time he’s done with you, you’re fucked out of your skull, covered in scratches, hickies, and cum, and being asked if you want to order taco bell
2025 © all works belong to @sugarwarachan. do not repost, translate, or steal any of my works. reblogs and comments always appreciated <3
#haikyuu x reader#hq x reader#hq smut#haikyuu smut#haikyuu imagines#haikyuu headcanons#mattsun#mattsun x reader#matsukawa issei#matsukawa x reader#iwaizumi hajime#iwaizumi x reader#iwaizumi smut#hanamaki takahiro#hanamaki x reader#haikyuu makki#oikawa tooru#oikawa x reader#oikawa smut#kuroo tetsurou#kuroo x reader#kuroo tetsuro x reader#kuroo smut#kozume kenma#kenma x reader#kenma smut#shohei fukunaga#haikyuu fukunaga#seijoh#nekoma
2K notes
·
View notes
Text
about to learn how to make gifs just for murder at the end tbh
#sunny txt#tutorials for downloading hq clips are helpful for video edits too#but who has the time YKWIM?#<—— man who finally has interest in fandom contribution beyond fanart in 2023
1 note
·
View note
Text


krøller & bølger hair pack
more info and download under the cut.
A hair pack with 4 new curly and wavy meshes bc I'm obsessed with getting better at these styles... still didn't manage to achieve exactly what I want but I think I've gotten closer, and they are nice looking regardless. So here you have them!
info:
࿔ base game compatible ࿔ 4 hairs, new meshes ࿔ hat compatible ࿔ HQ compatible ࿔ masc frame, enabled for fem frame, disallowed for random* ࿔ teen-elder ࿔ all LOD’s ࿔ 40 swatches - 24 EA'ish + 16 custom ࿔ high poly :/ una: 21,6k mio: 21,9k esben: 22,5k helmi: 30,9k🥵 (I'll probably make a tutorial in a few weeks on how to lower poly count on hairs yourself in blender. read this post for more info) ࿔ tou: edit/recolor them if you like, just credit me if you share and no paywall.
previews:


DOWNLOAD (SFS)
I hope you enjoy •ᴗ•<3
*I modeled the hairs on the masc frame, so they might not always work perfectly on fem frame sims but I enabled them anyway so you'd have the option. 😆
#ps krøller and bølger just means curls and waves in Danish but i aspire to be cool mysterious and edgy you know#pps they're all named after oc's of mine 🥹#sims 4#ts4#thesims4#my sims#mycc#sims 4 cc#ts4 cc#ts4 hair#showusyoursims
611 notes
·
View notes
Text
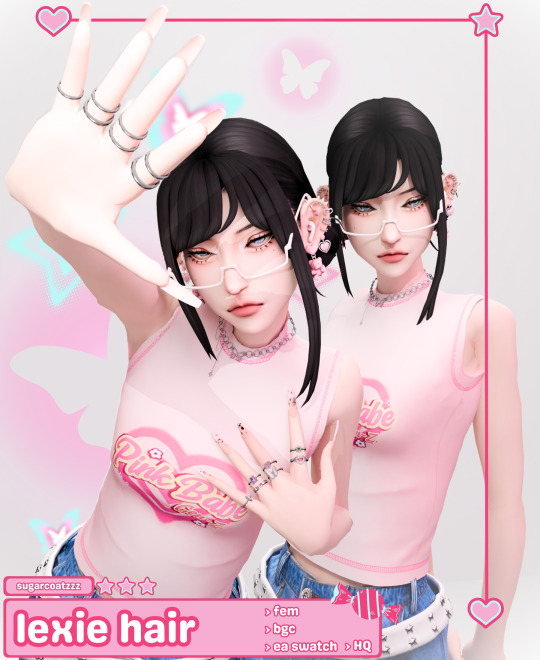
finally ! for so long, i've wanted to make hairs for ts4 but never felt confident enough to even try. knowing just how difficult it is now, i have a whole new respect for hair creators (ㅅ´ ˘ `)
this is my third attempt and while it's still not perfect, i really think it's cute on larisa^^ biggest praise and thanks to @wotunciba for being the main inspiration to finally make this effort + her insanely helpful resource lists, and @simandy / @simxndy for the many wonderful tutorials posted over the years (really, i'd still be trying to figure out the basics of frankenmesh otherwise)
okay ! hair time ( ˶ˆᗜˆ˵ )
lexie hair; › bgc / hat compatible / hq › fem frame › teen+
please let me know of any issues ! i love feedback and advice for improvement^^
DL FREE ON PATREON | KO-FI
#sims 4 cc hair#ts4 cc download#sims 4 custom content#sims 4 cc finds#ts4 hair#ts4 cc#sims 4 cc#sims 4 download#the sims 4 custom content#sims 4 custom content hair#mycc#ts4#simblr#sims 4#sims 4 aesthetic#the sims 4#sims cas#ts4 cc finds#ts4 cc free#ts4 cc cas#ts4 custom content#ts4 cc hair#s4cc#alwaysfreecc
599 notes
·
View notes
Text
how to build a digital music collection and stuff
spotify sucks aaaass. so start downloading shit!!
file format glossary
.wav is highest quality and biggest
.mp3 is very small, but uses lossy compression which means it's lower quality
.flac is smaller than .wav, but uses lossless compression so it's high quality
.m4a is an audio file format that apple uses. that's all i really know
downloading the music
doubledouble.top is a life saver. you can download from a variety of services including but not limited to apple music, spotify, soundcloud, tidal, deezer, etc.
i'd recommend ripping your music from tidal or apple music since they're the best quality (i think apple music gives you lossless audio anyway. .m4a can be both lossy and lossless, but from the text on doubledouble i assume they're ripping HQ files off apple music)
i also love love love cobalt.tools for ripping audio/video from youtube (they support a lot of other platforms too!)
of course, many artists have their music on bandcamp — purchase or download directly from them if you can. bandcamp offers a variety of file formats for download
file conversion
if you're downloading from apple music with doubledouble, it spits out an .m4a file.
.m4a is ok for some people but if you prefer .flac, you may wanna convert it. ffmpeg is a CLI (terminal) tool to help with media conversion
if you're on linux or macOS, you can use parameter expansion to batch convert all files in a folder. put the files in one place first, then with your terminal, cd into the directory and run:
for i in *.m4a; do ffmpeg -i "$i" "${i%.*}.flac"; done
this converts from .m4a to .flac — change the file extensions if needed.
soulseek
another way to get music is through soulseek. soulseek is a peer-to-peer file sharing network which is mainly used for music. nicotine+ is a pretty intuitive (and open-source) client if you don't like the official one.
you can probably find a better tutorial on soulseek somewhere else. just wanted to make this option known
it's bad etiquette to download from people without sharing files of your own, so make sure you've got something shared. also try to avoid queuing up more than 1-2 albums from one person in a row
tagging & organizing your music
tagging: adding metadata to a music file (eg. song name, artist name, album) that music players can recognize and display
if you've ripped music from a streaming platform, chances are it's already tagged. i've gotten files with slightly incorrect tags from doubledouble though, so if you care about that then you might wanna look into it
i use musicbrainz picard for my tagging. they've got pretty extensive documentation, which will probably be more useful than me
basically, you can look up album data from an online database into the program, and then match each track with its file. the program will tag each file correctly for you (there's also options for renaming the file according to a certain structure if you're into that!)
there's also beets, which is a CLI tool for... a lot of music collection management stuff. i haven't really used it myself, but if you feel up to it then they've got extensive documentation too. for most people, though, it's not really a necessity
how you wanna organize your music is completely up to you. my preferred filestructure is:
artist > album > track # track

using a music player
the options for this are pretty expansive. commonly used players i see include VLC, foobar2000, clementine (or a fork of it called strawberry), and cmus (for the terminal)
you can also totally use iTunes or something. i don't know what audio players other systems come with
i personally use dopamine. it's a little bit slow, but it's got a nice UI and is themeable plus has last.fm support (!!!)
don't let the github page fool you, you don't have to build from source. you can find the releases here
click the "assets" dropdown on the most recent release, and download whichever one is compatible with your OS
syncing
if you're fine with your files just being on one device (perhaps your computer, but perhaps also an USB drive or an mp3 player), you don't have to do this
you can sync with something like google drive, but i hate google more than i hate spotify
you can get a free nextcloud account from one of their providers with 2GB of free storage. you can use webDAV to access your files from an app on your phone or other device (documents by readdle has webDAV support, which is what i use)
disroot and blahaj.land are a couple providers i know that offer other services as well as nextcloud (so you get more with your account), but accounts are manually approved. do give them a look though!!
if you're tech-savvy and have an unused machine lying around, look into self-hosting your own nextcloud, or better yet, your own media server. i've heard that navidrome is a pretty good audio server. i unfortunately don't have experience with self-hosting at the moment so i have like zero advice to give here. yunohost seems to be a really easy way to manage a server
afterword
i don't know if any of this is helpful, but i just wanted to consolidate my personal advice in one place. fuck big tech. own your media, they could take it away from you at any moment
2K notes
·
View notes
Text
. . BREAK UP WITH YOUR GIRLFRIEND ! <3

𖦹 ・ ➷ in which accidentally texting the wrong number ends up costing you a stranger's relationship. correction : a hot stranger's relationship. on that note, uh, hey siri, is it morally incorrect to date someone whose relationship you just broke up? ...

### . STARRING ⌢ nishimura riki, yang jungwon from enhypen. kim minji, kang haerin from njz. lee chanyoung from riize. han dongmin, kim donghyun from boynextdoor. noh yunah, sakai moka from illit. lara rajgopalan from katseye. lee donghwa from kickflip.
### . GENRE ⌢ smau + crack + fluff
### . CW ⌢ swearing + questionable humor + this work does NOT condone cheating + no actual cheating occurs ˖ ✧
### . SUGGESTED 🎧 ⌢ break up with your girlfriend, ariana grande. so high, doja cat. drive u crazy, minnie. flu, ive. how long, charlie puth.
### . TAGLIST ⌢ open! send in asks or replies to be added >< @wonkixo @nicholasluvbot @notcamii @rikisgeef @inishij @pkjay @lisamrrth @enhamonsterghoul @nikirangs @starbyeol1512 @skzenhatxt-stan @tasnemluvs @wonuziex @sol3chu @vixialuvs @s0shroe @jaerisdiction @reikaxslvr @jeonginontopforever @i03jae @notab1tchwho @pookalicious-hq @paradiseoflosers @rikidaze @shhh1233728 @reveurdoll @ilovewonyo @yumilovesloona @riribelle @kirakun @ilovbeshotaro @wonzzziezzzz @cherryangel-coke @luvleyylina @rikiscupid @sunooluuvr @queenriki7 @stvrriki @mbella607 @chloelr60 @hoonieluv @eliiifnt55 @lovuegi @j-ji-jia @urmomdotcom5678 @right-person-wrong-time @ewsnup @fluerchive @rairaiblog @starzyviolet ⋆
🗨️ .. ⌞ XOXO ⌝ ok let's go. + [m.list]
𐙚 ° ˖ 0000. what does cat food have to do w my breakup
𐙚 ° ˖ 0001. introz [ dummies 101 || 5chalant + 1 emo mf ]
𐙚 ° ˖ 0002. aquaman privileges are EARNED nawt given
𐙚 ° ˖ 0003. speedrunning beef : a tutorial
𐙚 ° ˖ 0004. ok so where jackson wang @? [ written + texts ]
𐙚 ° ˖ 0005. tba
𐙚 ° ˖ 0006. tba
𐙚 ° ˖ 0007. bro is fr out here quoting tiktok sounds at me 🙏🙏 [ written + texts ]
𐙚 ° ˖ 0008. us emos gotta stick tgt.
𐙚 ° ˖ 0009. tba
𐙚 ° ˖ 0010. wsg gang (romantically).
[@bambisnc] 2k25
#ㅤㅤ[ 📋 ⋆ 𐙚 ]#enhypen#riki nishimura x reader#riki scenarios#enhypen headcanons#enhypen imagines#riki x reader#kpop x reader#niki x reader#riki texts#niki texts#riki smau#nishimura riki x reader#enhypen scenarios#nishimura riki#niki fluff#riki reactions#kpop smau#riki nishimura#enhypen x reader#enhypen niki#enhypen smau#enhypen riki#enhypen texts#ni ki texts#enhypen fluff#kpop texts
549 notes
·
View notes
Text
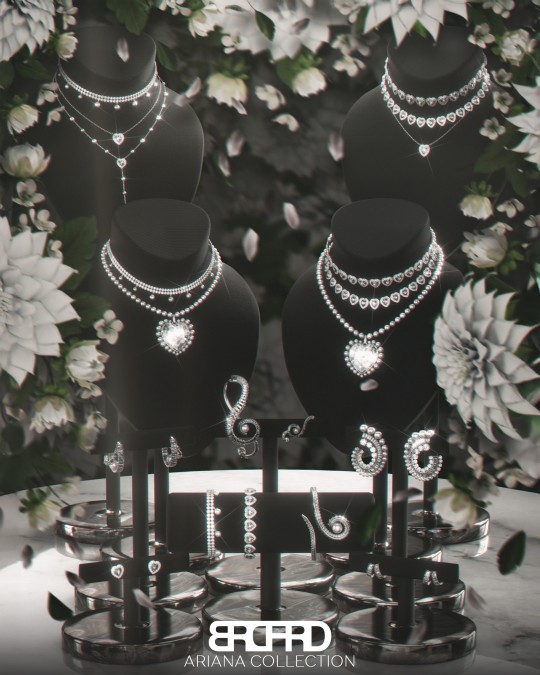
ARIANA COLLECTION /// GAME EDITION
/// New Meshes /// Unisex T/E /// 62 Packages
/// HQ Compatible /// BG Compatible
/// All LODs /// Custom Thumbnails /// Disallowed for Random
///↓DOWNLOAD↓///
PATREON [PUBLIC RELEASE: JUN 19]
------------------------------------------------------------------------------
/// Bracelets come in standalone and also in one set variant:

/// Earrings come in standalone and also in three set variants:

/// Necklaces come in standalone and also in ten set variants:

/// Necklace Sets:


------------------------------------------------------------------------------
ARIANA COLLECTION /// BLENDER EDITION* [SHOWN ON COVER]
/// Render Ready /// Adjustable Models /// Full Mix & Match Availability
/// File was made in Blender 4.4 using Cycles Materials
/// 8k Textures /// Material Nodes for Customization
/// How-To-Use Tutorial Included
///↓DOWNLOAD↓///
PATREON
-------------------------------------------------------------
BRADFORD'S SOCIAL MEDIA:
INSTAGRAM /// PINTEREST /// PATREON
-------------------------------------------------------------
*WHAT IS BLENDER EDITION?
Blender Edition is a special edition that has more texture space (usually 2048x2048) and can be used only in Blender due to different UV Mapping. This edition allows you to create renders with more quality and flexibility than models exported from the game itself.
Archive with this edition contains .blend file, diffuse textures, normal maps and tutorials on how to use it.
IMPORTANT NOTE:
Blender Editions will be available to Platinum and Diamond members only + Patreon Shop. Early Access doesn't apply to Blender Edition since this edition weren't made for the game and is basically a separate 3D Model.


#sims 4 cc#sims 4#sims 4 custom content#sims 4 accessories#sims 4 jewelry#sims 4 earrings#sims 4 necklace#sims 4 choker#sims 4 bracelet#ts4cc
331 notes
·
View notes
Text
How install override skins whit the HQ mod🎀
Thats tutorial is how install correct default skin replacement with the hq mod.
For what reason my skin's default doesn't work?? If you want to install default underwear with HQ mod, check out my tutorial.
If you use the HQ mod, you know that to have it work correctly, you need to install replacement HQ files. The problem with them is that when you install a cas override mod, your game looks as if you had never put the mods on your mods file. This happens because you have two overrides at the same time, and for overrides you can only have 1, so in this tutorial I will show you how to remove the Hq override that does not allow you to use the default mod of your skin.
First
U must have to have the latest versions of the Hq file replacement of the base game. In previous versions we had a Hq skins package, and that was so simple how to delete this file, but in the latest versions we have 3 files of overrides: BG_HQ_6, BG_HQ_7, and BG_HQ_8, and now we need to manually delete the textures with the list that the Hq´s replace creator gives us. It´s not a difficult process but is slow .___.
Second
When the Sims4Studio opens, we will open the BG_HQ_6. THE PROCESS IS THE SAME WHIT ALL PACKAGE. I´LL ONLY SHOW U WHIT THIS BECAUSE IS LITERALLY THE SAME WHIT THE LEFT OVER!!
Third
Into the package we will go to the HQ ID cas listand we will copy and paste the ids in our notes bloc (for if you have problems copying the ids on the S4 studio; if you don't have problems with this, only copy directly from the page).
and after we will copy the ID´s one at a time and click filter. If you click filter and you don't see textures, check that you don't have spaces in the text on the searcher.
After selecting the texture, click in the delete button and repeat the same process with all IDs in the list and the other packages. BG_HQ_7, BG_HQ_8,
Remember save the changes!!!!

Literally, that's all. It's not that complicated, just slow. If for some reason the S4 Studio is slow when you hit save, it's normal. Just let it load. Even if it doesn't respond, eventually it will. Keep in mind that you are deleting textures from a file. about 3 or 2 gb.
And that's all!! I hope that if you are having a problem with this, that tut can be useful. If your Sims look black in the game, it's probably that the skin override that you installed is incomplete, so if you want, you can see my realistic default skin that is compatible here ୨ৎ
Override underwear tut coming soon⋆。‧˚ʚ🍓ɞ˚‧。⋆
5 notes
·
View notes
Text

COLORING + SHARPENING TUTORIAL
someone asked for a coloring tutorial and my sharpening settings, so here it is! there are also a few tips to achieve more HQ gifs. :)
tutorial under the cut!
FOR HIGH-QUALITY GIFS
FILE SIZES
it doesn’t matter what your sharpening settings are if the file you’re using to gif is too low quality, so i tend to look for the best that i can get when downloading stuff.
usually, movies (+2h) look better if they’re 5GB or more, while an episode (40 min/1h) can look good with even 1GB. the minimum definition i try to find is 1080p, but i gif with 2160p (4k) when available. unfortunately, not every computer can handle 4k, but don’t worry, you can gif with 1080p files just fine if they are big enough. contrary to popular belief, size does matter! which means sometimes a bigger 1080p file is better than a smaller 2160p one, for example.
SCREENCAPPING METHOD
this can too influence the quality of your gifs. as a gifmaker, i’ve tried it all: video frames to layers, directly opening video clips, loading files into stack, and i’ve finally settled down with opening screencaps as an image sequence. with bigger files, it doesn’t matter much what technique you use, but i’ve noticed with smaller files you can do wonders if you screencap (either by loading files into stack or opening as an image sequence) instead of using video clips. for example, this gif’s original video file was only 4GB (so smaller than i’ve usually go for), if you can believe it!

here’s a tutorial for setting up and screencapping with MPV, the media player i use to screencap. again, you can keep using video clips for bigger files, but you’ll find this useful when dealing with dire causes. i don't file loads into stack, though, like the video does. i open as an image sequence (open > screencap folder > select any image > click the image sequence button). just select OK for the speed. this will open your screencaps as a video clip (blue bar) in timeline mode (i'm a timeline gifmaker, i don't know about you). you will need this action pack to convert the clip into frames if you're a frames gifmaker. i suggest you convert them into frames even if you're a timeline gifmaker, just convert them into a timeline again at the end. that way you can delete the screencaps right away, otherwise you will delete the screencaps and get a static image as a "gif".

ATTENTION if you’re a Mac Sonoma user, MPV won’t be an option for you unless you downgrade your system. that is, if you have an Intel chip. if you have M1 Max chip (or even a better one), here’s a fix for MPV you can try while keeping that MacOS, because nowadays MPV is skipping frames in its latest build. or you can use MPlayer instead for less hassle. here are two tutorials for setting and using MPlayer. Windows users are fine, you can use MPV without trouble.
FOR EVEN MORE QUALITY
ADD NOISE
here’s a tutorial for adding noise as a way to achieve more HQ gifs if your original material is too low quality.
REDUCE NOISE WITH CAMERA RAW
instead of adding noise, you can reduce it, especially if your gif is very noisy as it is.
the path is filter > camera raw > detail > nose reduction. i do this before sharpening, but only my video file isn't great to begin with. because it’s a smart filter, you can reduce or increase its opacity by clicking the bars next to its name in the layers panel.
TOPAZ AI
i use Topaz Photo AI to increase the quality of my screencaps when i need to. it’s paid software, but there are… ways to find it for free, usually on t0rrent websites. if someone’s interested, i can make a tutorial solely about it in the future.
SHARPENING SETTINGS
here are my sharpening settings (filter > sharpen > smart sharpen). i sharpen things twice: 500% 0.4px + 10% 10px. here's an action for it, for more convenience. here's a tutorial on how to use Photoshop actions. for animated stuff, i use this action pack.

COLORING
here’s the gif i'm gonna use as a base. it’s already sharpened like the way i always do it.

LIGHTNING THE SHOTS
half of the secret of a good coloring is good lightning. i always useCurves (layers > new adjustment layer > curves) and Brightness & Contrast (layers > new adjustment layer > brightness & contrast). the settings depend on the scene you’re giffing, but i always try make my gifs bright and with high contrast to make the colors pop.
CURVES
besides lighting your scene, the Curves adjustment layer has four automatic options that will color-correct it for you. it’s not always perfect and it doesn’t mean you won’t need to do further coloring, but it’s a great start. it’s a lifesaver for most ridiculously yellow scenes. look at the difference! this gif uses the 3rd automatic option (the screenshot below isn't mine btw so that's why the fourth option is the chosen one), from top to bottom. what automatic option you need to choose depends on the gif.


sometimes i like to tweak my Curves layer. not everybody does that, it’s not that necessary and if you’re not careful, it can screw your gif up. to modify your layer by hand, you will need to click and drag points of that straight line in the position you desire. this is the concept behind it:

basically, the lower part of the line handles the shadows, while the upper part handles the highlights of the image. if you pull a highlight point up, the image’s highlights will be brighter. if you pull it down, it will make them darker. same thing for the shadow points. you should play with it to get a grasp of it, that’s what i did when i first started giffing.
BRIGHTNESS & CONTRAST
then i added a bit of brightness and contrast.

CHANNEL MIXER
the scene looked a bit too yellow, so i used the Channel Mixer (layer > new adjustment layer > channel mixer) adjustment layer. here’s a tutorial of how it works. not every scene needs the Channel Mixer layer though, i mostly use it to remove heavy overall tints. in this particular case, the Curves layer got rid of most of the yellow, but i wanted the gif to be just a bit more blue so the Channel Mixer tweaks are very minimal.

SELECTIVE COLOR
now, this adjustment layer i always use: Selective Color (layer > new adjustment layer > selective color). this is THE adjustment layer to me, alongside the Curves one. this is how it works:

ie, you can separately edit a color this way, giving it tints. for this gif, i wanted to make the colors more vibrant. to achieve that, i edited the selected colors this way:

for the reds, i added even more red in them by moving the first slider to the right, making the color more vibrant. for his hat to have a more warm tint, i added yellow to the reds (third slider, moving it to the right). finally, to make the reds stronger, i moved the last slider to the right (more black).
for the yellows, i made them brighter by adding white to them, thus making the tile wall and Paddington more bright as well.
for the cyans and the blues, i just added the maximum (+100) of black that i could.
i wanted for Paddington's nose to be brighter, so i added more white to the whites.
lastly, i added depth to the blacks by increasing their own blackness.
you should always play with the Selective Colors sliders for a bit, before deciding what you want or need. with time, you will automatically know what to change to correct the color grading. it all takes practice!
HUE/SATURATION
i don’t know if you noticed, but there are some green spots on the blue wall behind Paddington. to correct that, i added a Hue/Saturation adjustment layer (layer > new adjustment layer > hue/saturation) and made the saturation of the greens 0%, making that unwanted green disappear from the background.

while the green spots on the wall are specific for this gif, i use hue/saturation a lot to tweak, well, hue and saturation. sometimes someone’s skin is too yellow, i made it redder by tweaking the reds and the yellows, or vice-versa. the hue bar follows the rainbow bar, so the maximum settings (+100 and -100) give the selected color to change its hue to something more red or pink (the rainbow extremities). changing hue can give pretty whacky results, like turning someone’s skin tone to green, so you will need to play with it to get the hang of it. you can also tweak the opacity of your hue/saturation layer to further improve your gif’s coloring. i didn’t do it in this case, the opacity is still 100%. the reds and the blues had their saturation increased to make them pop just a bit more, without affecting the other colors.
COLOR BALANCE
the highlights of the gif still had a green tint to it due to the automatic correction of the Curves layer, so i used Color Balance. this is how it works: instead of giving specific colors some tints, you can give them to the shadows, highlights, and mid-tones. if your shadows are too blue, you counterbalance them with the opposite color, yellow. same thing with the cyan-red and magenta-green pairings. in my case, i added a bit of magenta.


B&W GRADIENT MAP
now, if this gif was a dish, it’s time for the salt and pepper. i always add a Gradient Map (layer > new adjustment layer > gradient map) (black to white gradient) with the Soft Light blending mode, thus giving my shadows more depth without messing with the mid-tones and highlights. it also doesn’t “deep fry” (you know those memes?) the gif too much by adding even more contrast. usually, the opacity of the layer is between 30% to 70%, it all depends on the gif. it always does wonders, though!

COLOR FILTER
finally, i like to add Color Filters (layer > new adjustment layer > color filter) to my gifs. it’s very handy when giving different scenes for the same minimalistic set because it makes them kind of match despite having completely different colors. in this gif’s case, i added a “deep blue” filter, opacity 50% density 25. you can change the density and the opacity of the layer for further editing, again, it all depends on the gif.

VIBRANCE
if i feel like it, i add a vibrance layer (layer > new adjustment layer > vibrance) to make the colors pop. this can ruin your coloring sometimes, especially when regarding skin color, so be careful. i didn't do it in this gif because i felt i didn't need it.
TA-DA! 🥳
AN OTHER EXAMPLE
the color grading of the original scene it’s pretty good as it is, to be honest. let’s see a worse scenario, a VERY yellow one:


no channel mixer this time because the automatic curves option dealt with the yellowness, but you can see it made the gif too green. i needed to correct that with the following adjustment layers:
curves (automatic option) (gif 2) >> same curves layer (tweaks) (gif 3) >> brightness & contrast (gif 4) >> hue/saturation (tweaked cyan+blue+green) >> selective color >> color balance (gif 5) >> b&w gradient map >> (sepia) filter >> vibrance (gif 6)
i added a hue/saturation layer to remove the blues & greens before my selective color layer because i thought that was more urgent than tweaking the tint of all colors. color balance (gif 4) was the real hero here, though, by removing the green tint. the selective color layer was meant to make the red pop more than anything else, because the rest looked pretty good, especially her skin tone (despite the green tint). you can notice that tweaking the curves layer (small gif 3) also helped A LOT with the green problem.
tl;dr 😵💫😵💫😵💫
here's a list of my go-to's while coloring and lightning gifs. it's not a rule, just a guide. there are gifs in which i don't use all these adjustment layers, or use them in a different order. it all depends!
1. curves (automatic option + tweaks) 2. brightness & contrast 3. channel mixer 4. selective color 5. hue/saturation 6. color balance 7. b&w gradient map 8. color filter 9. vibrance
i'll suggest that you study each adjustment layer listed for more info, either with other Tumblr tutorials or YouTube ones. the YouTube ones focus on images, but you can translate what they teach to gif making very easily. you can ask me to further explain any adjustment layer, too! i was brief to keep this short (which i kinda failed lol).
feel free to ask me for clarification or something else about gifmaking wise, i always like to help. ❤️
#*#*tutorials#gifmaker tag#resources#resource: tutorials#ps help#uservivaldi#tuserjen#userrin#userelio#useralien#userzaynab#userchibi#userbuckleys#usertj#userbess#tuserlucie#useraljoscha#userdavid#usershreyu#usernolan#userhallie#userisaiah#tusergio#tusergeo#userjesslynn
794 notes
·
View notes